Let's organize your pre-cut quilling paper strips, so you can find any color or width quickly. Storage of conventional quilling paper can be done easily, while keeping it straight and tidy.
The conventional quilling paper I have my craft room are between 18 to 24” long, depending on the brand. I needed to extend the plastic sleeve a bit, to make sure the ends don’t flop around, so I cut another plastic sheet into thirds and added it on the right.
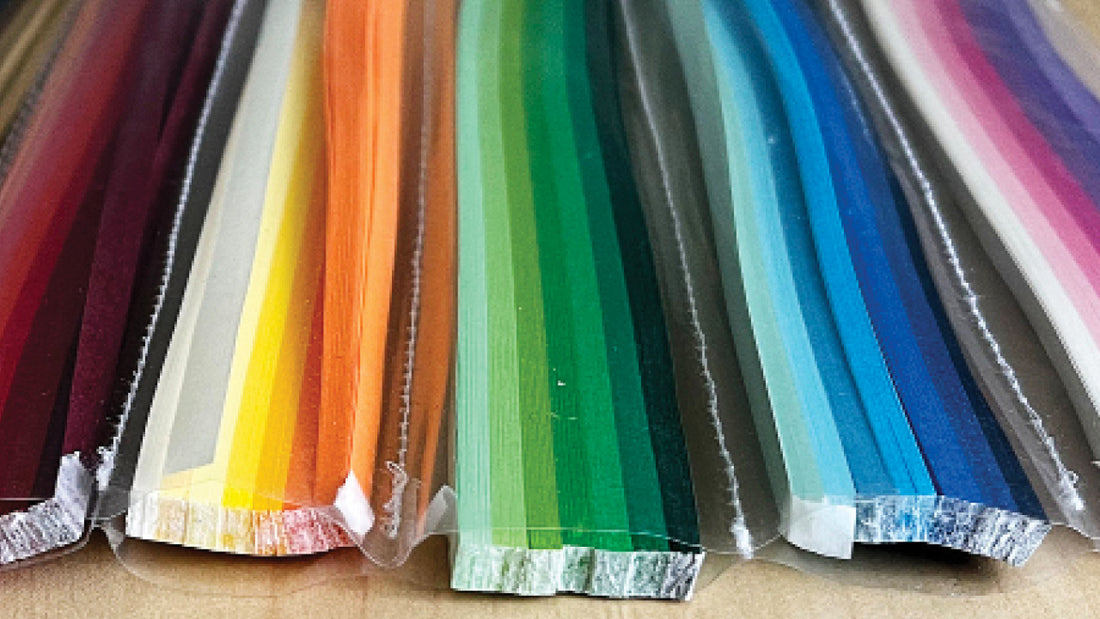
The plastic sheets are very thin, so it takes up less space in the drawer. I can stack several layers on top of each other in my drawer, and reach for a specific sheet, even if it’s on the bottom.
I’ve divided most sheets into 12 rows. I grouped colors in warm, cool, multi color, and wider/thicker strips. The wider/thicker strips obviously needed more room, so there are less rows on this sheet.
The clear plastic lets me find any color and check the width by turning the strips.
I plan to use Washi tape to remember the brand name and color.
As I slide the papers in, the rows help tame the strips with a few taps. Its easiest to slide the paper in from the left, because the top piece of plastic is shorter than the plastic on the bottom.
To detach a strip, pull the paper out slightly on the left, and detach on this side. Then detach the other side and slide the single strip out. The rest stays put.
Concerns
To figure out the row width, all I did was slide some paper in, and pinched the plastic to see how much friction was there, when I slid it back and forth. As you use up your paper, it won’t have as much friction because there’s more room. When this happens, the paper can skew diagonally. Other than the paper being a loose fit within the row, it doesn’t seem too bad. A loose fit in the row could result in it sliding out of the plastic sheet due to its own weight. So I do need to remember to keep the sheet level as I handle it.
You can put smaller quantities together to bulk it back up. Here I’ve put several single strips together, and as I pull on one strip, the rest seems to stay in place. I haven’t been using it long enough really to know if this is a nuisance, but so far it seems ok.
If you want a color in the middle of a multi color pack, I do find it need to pull the paper out more so I can get access to the color I need.
I would say it’s easier to detach paper from a pack that’s all the same color vs one that’s is a multicolour pack - but when you can’t decide on a single color, what are you gonna do?
Since the pros greatly outweighs the cons, so far I’m pretty happy with this method compared to my previous organizers.

How to Make Tutorial
Materials
- Download free template
- Large format plastic sheet protectors (I bought a version from Canada)
- Scoring tool (example: dried up pen)
- 24" ruler
- Scotch Removable Tape or MT Washi Tape
- Scissors
- Craft knife
- Sewing machine
Some of the links above are Amazon Affiliate links, and I earn from qualifying purchases at no extra cost to you.
Steps
-
Trim the right end off a plastic sheet to create a tube.
-
If your paper is long like mine, you may prefer to extend the length. Cut another sheet into thirds. This will extend your sheet by about 5.5 inches wide.
-
Since the first sheet and the extension are the same size, we need to tuck them into one another, to force it to overlap. Snip diagonal corners off the first protector on the left, about 1/4” in a 45° angle.
-
Tuck the snipped edge into the extension and tape in place on both sides. It’s important to tuck the left side inside, not outside. If you tuck it outside, as you slide your paper into the row, it can snag against this edge.
-
After you download my template, you’ll see I have two for you to choose from. Page 1 is divided into 12 rows x 1” high. Page 2, is divided into 12 rows unequally to give you a mix between larger multi-colour packs and smaller single color packs. Cut your chosen template vertically in half.
-
Insert the template halves on either side of the sheet protector.
-
Use a ruler and scoring tool to trace along the template, leaving an indentation in the plastic.
-
Remove the template and sew along the score lines. Now you’re ready to tidy up your supplies!
Do you have a favorite way of storing your quilling strips? Please share your ideas with the rest of the quilling community in the comments below!